Monday, October 22, 2012

Photoshop Tutor

PhotoshopTutor

Photoshop CS3-CS5 - Imagine the Possibilities
Learn Photoshop in one hour classes
Taught by an experienced and professional instructor in Adobe Photoshop
and Digital Photography
ONLINE with one hour classes tailored to your level & on your own computer,
Classes are $50 per session payable in advance

All sessions are directly taught to you through Skype where you will watch my desktop as I demonstrate your lessons in person. You will be able to converse, ask questions as if you were in a regular classroom and I was standing right there next to you.

Sunday, March 27, 2011

Ginormous PHOTOSHOP

Here is your FIRST Photoshop lesson. Use this as a basis to start with. Try out different colors, different fonts and different sized fonts too. If you make other discoveries - GREAT!! But be sure you have this basic lesson down pat. It's important. Really.


Beginning your Photoshop Document
Open the application. (Photoshop illustration  1.0)

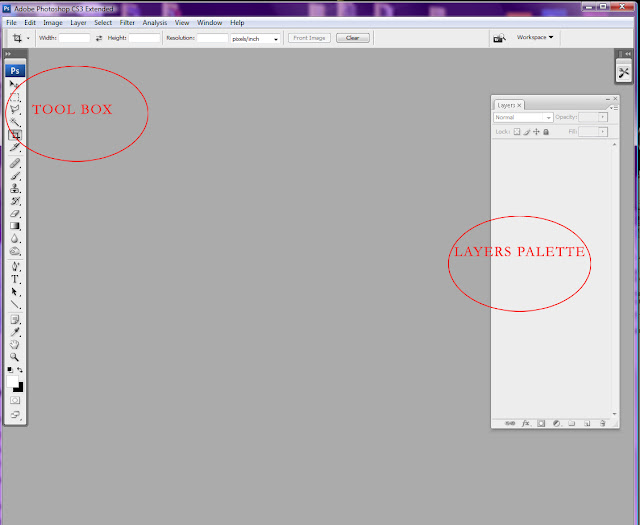
This is what you should see:

The tool box on the left and the Layers Palette on the right. If it doesn't look like this, then use the top arrow in that string of tools known as the TOOLBOX to move stuff around. If there are other palettes on there, use that little X in the upper corner of the palette - not PS itself - to get it out of the way. You aren't deleting it, honest.

(Photoshop illustration  1.0


Now go to FILE>New  (Photoshop illustration 2.0) This is the TOP of the page menu, first on the left.
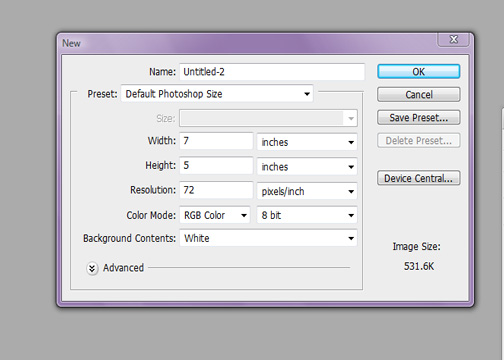
This is what you should see as the pop up menu -

(Photoshop illustration 2.0)


You want the preset to read “Default Photoshop Size” (sometimes I ask my students to make their image 600 px X 600 px  and 72 ppi. It's easier to work with)

It will automatically come up with the dialogue you see here. Check out the color mode as RGB Color and 8 bit. The background contents: white. You can change any of these later on. Don't be afraid to experiment and press those buttons to see what is underneath. But come back to this one as our lesson for today.

You may name this now: My First Photoshop (or whatever you wish)
- OR wait until you are done and then name it.
Press OK.


And this is what you should see: (Photoshop illustration 3.0)
(Photoshop illustration 3.0)


Next (Photoshop illustration 4.0) select the T or the TYPE TOOL on the tool bar (See below). Look at the top of your photoshop document and you will see selections to make for your font and the size as well as the color. If you want a different color, click on the rectangle color you see on the top bar. Select your color. Now you are ready to type some text. Use something simple, like your name or “My First Photoshop.”

Use the selection arrow – the first tool on the top of your toolbox – to move your text around. Position your text so you like where It is.

(Photoshop illustration 4.0)


Notice the two layers on the Layer Palette on the right. It's not circled - but notice it.


When you are done “playing” you will want to save your document. Go to FILE>SAVE

We will save it as a jpg this first time around but  one of the things you need to notice is the Layers Palette on your right. (I know, I mentioned this already - just checking!) Notice the 2 layers. They will become one layer when you save it as a jpg. You cannot change anything once you have saved it this way. (We will learn to save it later as a layers document so you can actually change anything you want to after you have worked on it, saved it and opened it again.That is what Photoshop is all about - LAYERS)

Save your first Photoshop document in a folder on your desktop so you will know where it is and also where you can put subsequent lessons. Print this lesson out and put your "first lesson" in the folder too.


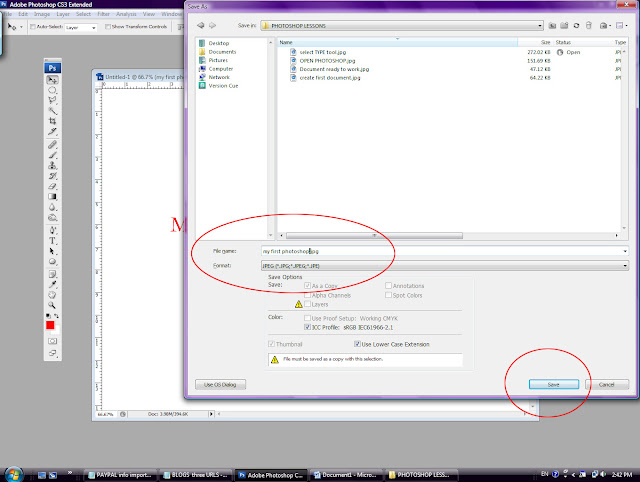
This is what your screen should look like (Photoshop illustration 5.0 when you are ready to save.  Go to MENU>SAVE and this large menu will pop up. Give it a name and save it as a JPG (pc) or a JPEG (mac/apple)

(Photoshop illustration 5.0)


Good work for your first lesson! See – it’s not that difficult is it?


The Photoshop mantra - Work Smarter, Not Harder!  


If you are really interested in learning Photoshop and would like personal one on one tutorials, made to your level of Photoshop (beginner to advanced - you tell me), I do offer classes online through SKYPE (free).  The classes are each $50 and I demonstrate for 45-50 mins. and then have a Q & A session with you for 10-15 mins. They are intense lessons and packed with tips and shortcuts to make your Photoshop learning easier. 

Sunday, March 6, 2011

For those asking about my teaching Photoshop....

JOIN STUDENTS WHO ARE LEARNING PHOTOSHOP ONLINE!


PhotoshopTutor

Photoshop CS3-CS5 - Imagine the Possibilities
Learn Photoshop in one hour classes
Taught by an experienced and professional instructor in Adobe Photoshop
and Digital Photography
ONLINE with one hour classes tailored to your level & on your own computer,
Classes are $50 per session payable in advance

All sessions are directly taught to you through Skype where you will watch my desktop as I demonstrate your lessons in person. You will be able to converse, ask questions as if you were in a regular classroom and I was standing right there next to you.


Email meEmail me


CLICK ON THE ABOVE ENVELOPE for direct contact with me.


CAMERA HOSPITAL - CHECKUP AND TLC

What do you do when your camera is being bionically worked on and there you are with no camera for a week or two?

Remember all those photos you have stashed on your computer? You know, the ones that you said “some day I will do something with these?” Here’s your chance.
Find the folders, the psd’s, the jpg’s and the RAW files to work with. Open your Photoshop app and begin to import (or drag right onto the Photoshop icon on your desktop - it will automatically open)  those photos that seem to all go together. Open no more than 6 or 7. Open a new file, a letter size, at 225 dpi. 
Now open one of your photos, grab the layer and pull it over to this document. It should drop it onto your newly opened document. Push it around with the arrow tool (Upper right in your tool box) Do this with all 6 photos. If they are too large, transform them into smaller. If they are too small, transform larger. Make any adjustments to color or to levels now. Each photo should be on its own layer, so you can also overlap.
Use your lasso tool with a pixel rating of about 25 and encircle a photo. Go to Inverse and then delete. You should have a fuzzy outlined photo. Do this with all your photos so that you have no hard photo edges. Now start to arrange your photos into a collage. Make some small, some large. Variety is the spice of life! Keep it interesting...
A collage of Allison who visited Disney this summer.
So much easier to look at than a bunch of single photos, don't you think? 

Add text to your collage. Choose a color that is predominant in your collage. Use the dropper tool to select the color. Make your type fairly large so it is readable from a distance. Use drop shadows and outlines.
Your collage is finished!
There is a multitude of techniques you can use on your collage to make it more individual. But for the most part, you have a nice collection of your photos and now you can print this out and put it in a frame or give as a gift!
So don’t let a “camera-less” situation stop you from playing in photoshop!

Sunday, February 13, 2011

Beware That Which Looks Easy

As the development of these photos comes about, I begin to add more techniques and avoid previous ones just to experiment and see what happens. Many of my photos take 4-8 hours to produce which surprises many people. It means a lot of time using applications such as Photoshop, Illustrator, Apophysis, and others. The photos are all originals, copyrighted by me. They look outstanding when framed and at present I have three of them being submitted to a juried show in Orlando.

Mother Nature Creates

 More of the "Mother Nature Series"
This photo has the addition of a fractal application (vector images created using Apophysis) The use of lighting techniques and masking are used extensively in these photos.
Mother Nature creating stars uses smoke brushes to obtain this effect. More masking and manipulation was used in this piece.

 This approach was a bit different than the others as I used glowing lines that were created in photoshop first and then applied to the photo. Lighting effects again were utilized.

Saturday, January 1, 2011

New Year's Eve

A change of plans caused me to stay at home on New Year's Eve this year and it was rather nice actually. While everyone else was out celebrating in their own way, I celebrated by getting high on Photoshop. Here is the photo worked on just for fun -

"Mother Nature Designs the
Universe"

 ______________________
And on Jan 2, I designed a second "Mother Nature" who was creating red stars in the galaxy. I kind of like this idea.
 I've been using my timer and taking my own photos - no need for a model release! And besides, I am the ONLY one around. Thought this was pretty cool actually. Then downloaded some smoke brushes and followed a tutorial that was awesome. 
I like what I've been getting. Want to do more.

Wednesday, November 17, 2010

Signage Series and HDR

Shot at Downtown Disney, the House of Blues outdoors. Another HDR taken with handheld camera shots. The lightbulbs disappeared after my first try at the processing so I had to go back, mask a copy and do a levels on the lights. They seem to be more a part of the photo now whereas before they disappeared. The HDR on this is very effective I think. Details are brought out and the overall feel is one of an old building perhaps somewhere in the south. Is it Happy Hour yet?

Seen on Amelia Island, this painted building sign dates back to the early 1900's. Coke may not have been around then (well, maybe it was, I don't know) but using HDR technique really brings out the age of the bricks and details. The Palace/Saloon with Coca Cola was kind of tongue in cheek I thought.
Number 5  seems to have some kind of significance but I don't know what. I just liked the lighting on the sign and the strong contrast of light and dark. Also, the linear composition is very strong...This is an HDR example even though I handheld the shots.